Wednesday, April 23, 2008
Thursday, April 17, 2008
This Week In Art...
We are continuing our study of the artist Jan Van Eyck.
 The Adoration of the Lamb by Jan van Eyck.
This painting is part of the Ghent Altarpiece which is pictured below.

http://en.wikipedia.org/wiki/Ghent_Altarpiece
Van Eyck pays as much attention to the beauty of earthly things as to the religious themes. The clothes and jewels, the fountain, nature surrounding the scene, the churches and landscape in the background, everything is painted with remarkable detail. The landscape shows an enormous richness in vegetation, much of it non-European.
( Copied from the link above. Check out the link it has great information on this painting and lots of photos so that you can see the detail of the painting.)
WHY WAS IT CREATED ?
The altarpiece was painted to decorate the private chapel of a rich couple, Judocus (Joost) Vijd and his wife Elisabeth Borluut. Joost Vijd belonged to the most influential citizens of his town, and his wife belonged to the famous Borluut family of Ghent. Presumably, Joost Vijd ordered the painting already in 1420. On usual weekdays the polyptych was closed. The inside panels were shown to the public on Sundays and religious holidays. From the beginning it drew large crowds to the cathedral. Only recently, the altarpiece has been taken out of its original chapel and is now to be admired in one of the side-chapels at the entrance of the cathedral. (copied from http://www.trabel.com/gent/gent-misticlambintroduction.htm )
The altarpiece was painted to decorate the private chapel of a rich couple, Judocus (Joost) Vijd and his wife Elisabeth Borluut. Joost Vijd belonged to the most influential citizens of his town, and his wife belonged to the famous Borluut family of Ghent. Presumably, Joost Vijd ordered the painting already in 1420. On usual weekdays the polyptych was closed. The inside panels were shown to the public on Sundays and religious holidays. From the beginning it drew large crowds to the cathedral. Only recently, the altarpiece has been taken out of its original chapel and is now to be admired in one of the side-chapels at the entrance of the cathedral. (copied from http://www.trabel.com/gent/gent-misticlambintroduction.htm )
Also check out these websites:
http://nhcs.k12.in.us/staff/pbortka/pronouceguide/ This site helps with pronouncing the names of artist.
Entertaining Toddlers While Educating Older Children
Hannah is getting older and I am finding it harder to educate the older children because Hannah realizes that she is not the center of attention. Therefore, I had to think back to when Sierra was younger. I tried to remember some of the activities I did with her and things I had for her to do when I needed a few minutes to get things done. When I started thinking back, I remembered my "Toddler Totes/Bags". The funniest things was that I was already putting these together for Hannah. I thought I would list some things on the blog that have worked and are working for us.
Entertaining Toddlers while Home Educating Older Siblings
Some tips before you begin your day:
· Take care of the needs of the little ones before you begin.
· Alternate between lessons for older ones and time with little ones.
· Keep lessons short. Subjects can be 20 – 30 minutes each.
· Remember that you do not have to teach every subject every day.
· Take breaks often.
· Teach toddlers to entertain themselves for 15 minutes at a time. (**See the note below.)
· Include toddlers when you can.
· Make use of the highchair during school time.
· Think about teaching some subjects during naptime, or in the evenings.
· Think about teaching some subjects outside. You can let the little ones play while the older ones are listening to you read.
· Set realistic goals.
· Choose the right time to educate. There have been times when afternoons worked best because little ones needed attention in the mornings. Sometime the little ones are better in the morning, so this would be a good time to start. When I only had one child and my husband was home during the day, we schooled in the early evening.
· Make bags and boxes of toys for your toddler to use only during school time. (see Toddler Totes/Bags)
· Remember that children are a blessing from the Lord even when your day is consistently being interrupted by demanding toddlers.
Teaching Toddlers to Entertain Themselves
Teaching Toddlers to Entertain Themselves
** Teaching toddlers to entertain themselves for 15 minutes at a time might seem like an impossible task. However, this can be obtained with training. This is what I have done. I give her a “toddler tote/bag” on a blanket near me. I explain that she needs to stay on the blanket and play with her toys. I set the timer and tell her when it goes off that she may get up. I start out with a time, I think she can accomplish. Usually, 5 minutes at first. Then I increase the time by a minute each day. I usually have this training session, at least twice a day when I start out. If she wants to get up, I tell her “no” and place her back on the blanket. I also show her the toys and give her suggestions on how to play with them. Then I walk away. No matter what, she must stay on the blanket until the timer goes off. When the timer goes off, I let her know that she may get up or continue to play with her toys. A lot of the time, she will want to get up and get a different “toddler tote/bag”. This is fine if she cleans up first. If she gets another “toddler tote/bag”, I set the timer again but for an extra minute. Within 2 weeks, she was entertaining herself for 20 -30 minutes at a time. I have learned what “toddler totes/bags” she likes the best. I save these when I need her to occupy herself the longest. Sometimes, I let her choose the “toddler tote/bag”.
Getting toddlers to entertain themselves for short amounts of time is possible. Once it is complete, you will be glad you invested the time in training.
*** I have to remember that The Lord gave me my children and wants me to educate them. They are not an interruption but a blessing. I pray, ask for wisdom, SMILE, and do the next thing – Love my children as Christ loves me.
Toddler Tote/Bags
I use the clear small totes that stack easily. For the bags, I use different size zipper bags. These are plastic so I empty them and put the bag away. When it is time to clean up, I supervise the clean up. (Toddlers can fit there head into a Ziploc bag.)
Toddler Tote/Bags
· Wooden Puzzles
· Wooden Alphabet Blocks
· Large buttons and shoe laces. (This is a set I bought. These buttons are from 2 to 4 inches in diameter.) Smaller buttons can be a choking hazard.
· Store brand Cereal and yarn (The yarn is tied around one piece of cereal on the end. This way she can add cereal pieces without them falling off.)
· Play Dough with cookie cutters, roller, small bowls, etc.
· Coffee money can. This is a coffee can with a slit in the top with cardboard circles. (I have used play money when she got older and wouldn’t put them into her mouth.) Also in this bag are other toys that she can put into the coffee can and close the lid.
· Sandpaper with yarn. (She loves taking the yarn on and off the sandpaper. I show her how to make different shapes.)
· Large Lego’s
· Flash cards with colors, shapes, or pictures on them.
· Counting bears with egg carton. (She loves sorting the bears by color into the egg carton.)
· Ice cube tray with different kinds of store brand cereal. (I usually do not let her use this bag close to lunch or dinner.) Remember to throw away the cereal after she plays with it and replace it with new.
· Magnetic board with letters
· Tote with cereal (Rice Krispies) and spoons, funnel, bowls and cups. I usually add the cereal before she plays with this and throw it away when she is done. This is a great alternative to rice or beans but it still makes a mess.
· A collection of hard plastic animals and some cars.
· Foam shapes with holes around the edges with long shoe strings for lacing. (I bought these at Target)
· Some small board books.
Table and Outside Activities
Table Activities
· Crayons, colored pencils and paper
· Assorted paper for her to tear up.
· Paper and stickers
· Stencils and colored pencils
· Paper, magazine cut outs and a glue stick. (This activity is supervised because sometimes she will use the glue stick like lipstick.) (This is a great activity when the other children and doing their Book of Centuries.)
Outside Activities
· Sidewalk Chalk
· Bucket of Water and paint brush. She can paint anything with water!!
· Balls of all sizes.
· Sand and sand toys (Fill a tote with sand if you do not have a sandbox.)
· Small blocks of wood with play hammer
· Water and buckets, funnels, scoops, cups and a boat. The water is placed in a tote. If she dumps the water out, I do not refill it!!
Our deck is directly off our kitchen. Therefore, Hannah can play with water, sand, and chalk on the deck while we do our lessons.
Wednesday, April 16, 2008

Tuesday, April 15, 2008
Happy Birthday Hannah-Faith
Happy Birthday to you,
Happy Birthday to you,
Happy Birthday to Hannah
Happy Birthday to you!
 Last Birthday 2007
 She will soon be 2 years old.

Happy Birthday to you,
Happy Birthday to Hannah
Happy Birthday to you!
Last Birthday 2007 She will soon be 2 years old.This year Hannah-Faith has changed so much. Last year she was screaming for EVERYTHING she wanted. Now, she is using words and SCREAMING. She loves the outdoors, playing babies, and sitting in her Mommy's lap. She is always on the move. She knows what she wants and is very determined in getting her way. This year she has found herself standing in the corner and in Timeout quite a bit. She is learning about obeying and that she doesn't always get her way.
The little girl that came to us around 5 lbs. in now 30 lbs. She is still our bundle of joy.
Here are some pictures from the last year.

May 2007

 First time Hannah brushed her teeth.
First Pickle - Aug. 2007

December 2007

February 2008 - First time Hannah played with Play Dough.

Hannah's first Peanut Butter Sandwich. March 2008
HAPPY BIRTHDAY HANNAH-FAITH!! WE LOVE YOU!!
Friday, April 11, 2008
Paintings for the Week
Jan van Eyck - Crucifixion and Last Judgement (1420 -1425)

The Ghent Altarpiece (completed 1432)

http://en.wikipedia.org/wiki/Jan_van_Eyck Read more about the artist we are studying.
Thursday, April 10, 2008
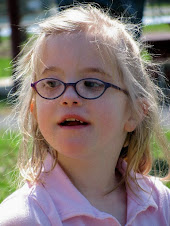
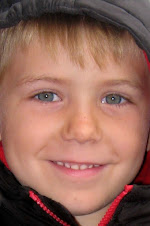
Hannah and Friend
We were outside the other day with our friends that live next door. When their little boy, who Hannah calls "MeMe", and Hannah started up the hill. We all started laughing because it reminded us of the nursery rhyme "Jack and Jill".

MeMe and Hannah went up the hill
Looking for water.
MeMe came down
against his will
And Hannah did not go any farther.
Wednesday, April 9, 2008

Tuesday, April 8, 2008
2007-2008 Schedule
OUR HOMESCHOOL SCHEDULE
8:00- Everyone is up and doing their morning routine**
9:00 – 11:30 – Learning, Reading, Projects with Mom. This also means some independent work when Mom is busy with Little Ones
11:30 – Prepare Lunch – Midday Chores
12:00 – 12:30- Lunch, clean up and short break
12:30- 1:00 – Individual time with Andrew
1:00- 1:30 – Individual time with Sierra
1:30-3:30 – Hannah naps
1:30- 2:30 – Independent work for Sierra and Andrew
2:30- 3:30 – Quite time or outside play (NO Video Viewing)
3:30-4:00 – Free time
4:00 – 5:00 – Play with Hannah, Finish Chores
5:00- 6:00 – Daddy time**, Dinner, Clean up
6:00 – 7:30 Play time
7:30 – 8:30 Bedtime Routine
8:30 – Andrew and Hannah’s Bedtime
10:00 – Sierra’s Bedtime (from 8:30 until 10:00 Sierra has free time. She must be IN BED at 10:05)
11:30 – Mama’s Bedtime
** Morning Routine – make bed, eat breakfast, brush teeth and hair, get dressed and complete morning chores.
** Bedtime Routine – snack, brush teeth and hair, get dressed for bed, and pick up toys
** Daddy Time – a quick cleaning up of the house. Pick up toys, clothes, and straighten blankets and pillows.
CHECK CHORE CHART FOR DAILY CHORE RESPONSIBILITIES
(I am working on a new schedule for the coming school year. It will be more detailed.)
Our Artist Study
Since I have been posting about our Artist Study, I thought I would tell you how we go about studying the artist. Starting this month, I chose the artist by following the recommendation from Ambleside Online. (our new curriculum). However, last month we studied Giotto. This was my choosing. AO recommends that you stay with an artist for the term. The terms are 12 weeks each. Because we will finish our term at the end of April, we will only study this artist for 4 weeks. AO gives you 6 paintings to study each term.
We work on our Artist Study during lunch. (Our Artist Study is scheduled for Fridays. However, the children will ask to do it more often.) I copy the paintings into jpeg format and have them printed at Walgreen's into 4x6 prints.
Day One Artist Study
I place the photo of the painting on the table. The children look at it during lunch. When we are finished eating, each child narrates to me what they see in the painting. I don't add much to the discussion on this day except for the name of the Artist.
Day Two
The children look at the same photo of the painting again during lunch. This time when they narrate they have to be more descriptive. I may ask them questions like, "What would you name this painting?", "How does this painting make you feel?", "What do you like or not like about the painting?", etc. Then we read about the life of the Artist.
If we have only studied on Fridays, I will introduce a new painting every other Monday. However if we have done the study more than twice in one week, I will introduce a new painting each Monday. Usually, every Monday we have a new painting to study and the children have studied the painting at least 4 days. All the photos are displayed on the side of the kitchen cabinet facing the table. This way the children can examine the photos of the paintings at their leisure.
After we have studied all the AO recommendations for the artist, I will choose more as time allows. Each time a new painting is introduced, we follow the Day One/Day Two schedule. If they study the painting more than two days, I just keep asking them more questions if their narrations are not detailed. We also go over the main facts about the artist.
On Week Six
The children write a notebook page about the artist. At the end of the term, they get to pick a photo to paste on their notebook page. The rest of the photos go in our Artist Scrapbook. This way I can store the photos for later use and the children can look at the book at anytime.
On Week Ten - Or when we complete at least 6 paintings
We will look on the computer at several paintings by the artist that I didn't get photocopied.
The Last Lesson Of Each Artist - Week 12
I ask the children to pick a painting they liked the best and draw their interpretation of the painting. They also have to choose a title for the painting and color it with colored pencils.
I hope this was clear. I am not blest with the talent of writing. If you have any questions, please post in the comment section and I will try to answer you.
Monday, April 7, 2008
Saturday, April 5, 2008
Nature Journals
The children have been doing their Nature Study on Fridays. However, today is rained all day. These are their nature journal entries from last week. So far, I have not been giving them a specific topic to draw/write about. Their assignment is to go outside and find something to draw in their journals. Then they have to describe what they drew. They are not allowed to play until they complete their journal entry.

 This week, Sierra drew Dandelions and a Ladybug.
Andrew drew a young Cedar Tree and a Dandelion Seed Head.
You can read about Dandelions pages 531 - 535 in Handbook of Nature Study by Anna Botsford Comstock. Also below are some websites to check out.
http://www.wildmanstevebrill.com/Plants.Folder/Dandelion.html
http://www.wildmanstevebrill.com/Plants.Folder/Dandelion.html
Friday, April 4, 2008
Art and Artist
We have been studying the artist Giotto. Each child had to pick a favorite painting and draw their interpretation of the painting.
This is Andrew's drawing of the painting Crucifix by Giotto.

This is Giotto's painting.
This is Andrew's drawing of the painting Crucifix by Giotto.

This is Giotto's painting.

This is Sierra's drawing of the painting Madonna and Child.

This is Giotto's painting.

Wednesday, April 2, 2008
Winter Poems
Sierra and Andrew had an assignment to write a Winter Poem. It could be about anything dealing with Winter. After they wrote their poem, they had to draw a picture illustrating the poem.
Andrew chose to write about "Hot Chocolate".
Here is his poem.
Hot Chocolate
When we come inside from playing with snow,
My Mommy gives us Hot Chocolate.
It tastes warm and good.

This is Sierra's Poem.
A Snowy Day
I look out the window to my surprise,
I see the snow falling down covering the ground,
Pure white like the wedding dress of a bride.
I see a deer standing there in the snow.
His Winder coat glistening, his spots glowing white,
But when he sees me he runs.
He runs with fright.
The snow silently falling;
We think it’s all done.
We go out to see our creek covered with snow.
The roof top of our house,
And the houses around us
Look like a little village that is from a story book.
The trees in our yard have snow piled high,
On there branches.
A Blue Bird sits there fluffing his feathers,
Of his new winter coat.
Such a beautiful sight,
So quite and calm.
It looks like a movie plot,
But oh, it is NOT!
As I look up at the sky,
I watch the snow fall.
Oh, what a gorgeous sight.
A wonderful snowy day.
Andrew chose to write about "Hot Chocolate".

Here is his poem.
Hot Chocolate
When we come inside from playing with snow,
My Mommy gives us Hot Chocolate.
It tastes warm and good.

This is Sierra's Poem.
A Snowy Day
I look out the window to my surprise,
I see the snow falling down covering the ground,
Pure white like the wedding dress of a bride.
I see a deer standing there in the snow.
His Winder coat glistening, his spots glowing white,
But when he sees me he runs.
He runs with fright.
The snow silently falling;
We think it’s all done.
We go out to see our creek covered with snow.
The roof top of our house,
And the houses around us
Look like a little village that is from a story book.
The trees in our yard have snow piled high,
On there branches.
A Blue Bird sits there fluffing his feathers,
Of his new winter coat.
Such a beautiful sight,
So quite and calm.
It looks like a movie plot,
But oh, it is NOT!
As I look up at the sky,
I watch the snow fall.
Oh, what a gorgeous sight.
A wonderful snowy day.

Tuesday, April 1, 2008
Reading Lesson
Andrew’s First Reading Lesson
1. I asked Andrew what word he would like to know how to read. (CM would have chosen a poem and used the first line. I am sure we will do this next but for now I just wanted to see if Andrew was ready to learn to read.) Andrew’s reply was the word “ball”. I made up the sentence “Eli has a ball.”
2. I wrote each word on a card. I showed Andrew the words in a random order. When I showed him the word, I asked him the letters in the words and if he knew the sounds of each letter. I read the word and then sounded it out. However, I did not spend a lot of time on the phonics part.
3. I gave Andrew the cards one at a time for him to study. I told him to look at the word, then close his eyes and picture the word on the card.
4. After we went over each word, I gave him his letter tiles. I asked him to spell each word with the letter tiles.
5. Once he spelled them with the letter tiles, I showed him the cards again. This time, I asked him to make the sentence “Eli has a ball.”
6. Then, he read me the sentence without help.
7. This entire lesson lasted 15 minutes.
Second Reading Lesson (Spelling)
Before I explain this lesson, I will say that I thought that Andrew probably memorized the sentence from yesterday. Therefore, I did not expect him to be able to spell the words without some help from me.
1. I gave Andrew the letter tiles and asked him to spell each word that I called out. I called out the words from yesterday in a random order. He only had trouble with the word “has”. He put the “h” and then “s” letter tile down. I asked him to close his eyes and see if he could remember the word on the card from yesterday. He smiled and quickly put the “a” in the right place.
2. Next, I asked him to make the sentence from yesterday. I did not tell him the sentence. He put all the words in the correct order.
3. After rejoicing together, I gave him his writing tablet. I asked him to write each word that I called out. Again, I did this in a random order. Then I asked him to write the sentence “Eli has a ball”.
4. Once he completed his writing, we talked about the word “ball”. I showed him the word “all” inside of “ball”. Then, we made the words “hall, call, fall, tall, and mall”. We also talked about “has” and “as”.
This may not have been an exact Charlotte Mason reading lesson. I will have to say that within 3 days Andrew could read and spell 10 words. I am completely amazed. Now, I am looking for a poem for him to read. I am going to research more on the Charlotte Mason approach to reading and try to improve our lessons.
Subscribe to:
Comments (Atom)


.jpg)